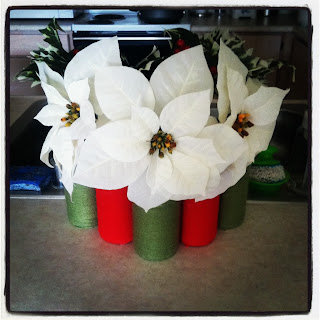
I decided to try and make those yarn wrapped wreaths that have been all over pinterest lately, but put a Christmas spin on them so I could have some more cute Christmas decor.
My original inspiration:
I got lucky and asked my friends, who are great at recycling, if they had any glass beer bottles. They had 12 and I took 6 with the promise I may return for more. I used all the same kind of bottle (Pyramid beer) but you could also use different sizes and get a different kind of look.
Supplies for the vases:
Yarn
Glass Bottles
Hot glue gun
Dish soap
Spray adhesive (optional)
Supplies for the flowers:
Fake flowers (or real) - I got a white poinsetta bunch
Fake filler (or real) - I used holly
Instructions for the vases:
I used red and green to make these Christmas colors, but you could do any combination you want. After making them, I think multicolored yarn would also make a cool look. The darker the color, the more visible the glue, so keep that in mind. My pastel green vases have less visible marks than the red. If you are a perfectionist and the glue marks would bug you, your best bet would be to use white.
The colors I picked were Tea Leaf green and Cherry Red.
1) Fill your sink basin with warm soapy water and let the bottles sit for 10 minutes or so. The labels will peel right off. Don't worry about the sticky stuff left behind - you won't be able to see it behind the yarn.
2) Start from the bottom of the bottle, where the is a slightly rounded edge. Put a line of hot glue about 2 inches long along the bottom, and place the end of the yarn in the glue. Continue as you move around the bottom of the bottle. I suggest a 2 inch line because if you do too much, the glue will lose it's stickiness by the time you get the yarn to it. I used hot glue on the first two rows.
3) Continue winding your yarn around the bottle. I found it worked well and was much faster to haphazardly wind the yarn around the bottle five or six times, and then push the rows down. This works until you get closer to the top.
3) The biggest pain in the ass is when the bottle starts to change shape about two thirds of the way up. You will find the yarn keeps slipping up and is almost impossible to keep in place. I found two different ways to deal with this, and if anyone else has any other ideas, I would love to know.
First way: Dot hot glue every two inches or so and stick the yarn in it as you go. I used scissors to push the yarn into place if it wasn't cooperating. Do this all the way up until you reach the neck of the bottle and the yarn stops wiggling out of place.
Second way: Still dot hot glue for the first few rows when the bottle changes shape, but then spray the lower part of the bottle neck with adhesive spray glue. Wait at least 30 seconds until this glue gets tacky, and then start winding the yarn around the bottle. Again, I used scissors to push the yarn into place.
The first way is much more time consuming, but the second way leaves more glue marks, so you will have to pick which you care more about - saving a bit of time or looking a bit cleaner.
Also note that I did not find a way to make the bottle neck as tightly wound as the rest of the bottle. Even with these techniques, it still look a bit looser, but I think it looks fine. Plus, your flowers will probably cover most of it up.
4) When you reach the very top of the bottle and everything is covered, it is easiest to put a dot of hot glue, lay the yarn in it, and then cut the yarn.
Follow these steps for as many vases/colors as you want. I did two red and three green.
Instructions for the flowers:
I bought my flowers at Walmart. It was $3 for the poinsetta bunch which had 5 flowers, and $3 for the holly bunch. I would recommend getting large flowers, because the flowers cover up any imperfections from gluing the bottle neck. Make sure you pick flowers that look nice and do not have crushed leaves.
You will also need wire cutters - I got these in the hardware section of Walmart.
Then, use the wire cutters to cut the individual stems that have the flowers on them. You can adjust the length of the stem for what looks best in the bottle. Do the same to cut individual rows of holly or whatever you chose as filler.
For display, I chose to do a V-shape pattern, alternating green and red vases. I put three poinsettas in the middle bases, and holly on the two end vases.
I also thought about hot gluing the vases together in a particular shape, but I wanted to be able to move them around as I please. However, if you have a particular shape you love, I think it would work well to hot glue the vases together in that pattern.


2 comments:
I love it!!!
xox
cute idea! love it :)
Post a Comment